


Wellhöfer Attic Hatch
Product Overview
Main purpose
To provide access to the attic or roof space without compromising the airtightness or thermal performance of a building.
Use it on
All ceiling types in domestic and commercial buildings.
Overview
The Wellhöfer attic hatch provides loft access without compromising the airtightness and insulation of an airtight building. The hatch is fully airtight, easy to install certified to EN 1026:200-09.
Where to use it
A Wellhöfer Airtight Insulated Attic Hatch can be fitted in the ceiling of an airtight newbuild or refurbishment (retrofit) to prevent heat loss through the roof space and eliminate air leaks.
As loft or roof space access requires a large hole in the insulation and airtight layer of a building, the attic hatch is critical to the effectiveness of the building’s insulation and airtightness layer. The hatch is compatible with all types of ceiling including those with timber joists/beams, suspended ceilings and concrete ceilings.
What it does
A Wellhöfer attic hatch provides access to the roof space or loft without compromising airtightness or the effectiveness of the building’s insulation.
Air leaks around attic hatches drastically reduce the effectiveness of the building’s insulation layer, cause cold-spots and lead to condensation when warm humid air from the building meets cold air in the loft/roof space. Poorly performing insulation will also increase the overall heating costs of the building.
This hatch has 96mm of high performance insulation built-in and an innovative sealing system to ensure no air can leak via the door or from around the edges of the frame.
How it works
The attic hatch door is made from white 16mm melamine resin-coated chipboard and includes a locking mechanism so it cannot be opened from above. The weight of the ladder is counter-balanced with a lever and spring system to evenly spread the load and provide a safe low-effort operation. This also provides even contact pressure for a proper airtight seal.
The airtightness level achieved with Wellhöfer attic hatches remains the same during airtightness tests (blower door test)
Why we love it
Wellhöfer are the only attic hatches in the world where both the hatch door and frame are certified as airtight. The perimeter casing uses Wellhöfer ’s HOKA twin wall sealing system to provide an exceptional level of airtight detailing. This is one of Wellhöfer’s leading features which contributes to the success of the hatches over the past 60 years. It is simple to install and ensures there is no air leakage or resulting heat loss between the perimeter of the attic hatch and surrounding timber framework (or concrete).
Wellhöfer airtight and insulated attic hatches have also completed thorough testing for the emission of harmful chemicals, VOCs and off gassing. The test results showed that attic hatch has a rating 9 times lower than the “harmless” level required by the Sentinel Haus Institut, while the formaldehyde emission value is recorded at being 16 times lower.
Features
- Unique airtight sealing system of door and frame
- Both the attic door seal and perimeter casing are certified airtight (Class 4)
- Fully insulated attic hatch door and perimeter seal
- Stringently tested for airtightness & thermal performance
- Surpassed VOC and emission testing by renowned Sentinal Haus Institut
- Manufactured by world leader in high performance attic hatches
Benefits
- Proper sealing of the hatch frame prevents the air leakage equivalent of an A5 size hole in your ceiling.
- Preventing heat loss through the attic improves energy efficiency and reduces heating bills.
- Each hatch is built with experience gained over 60 years.
- Ideal for projects that want to meet tough building performance requirements or standards.
- Provides permanently high levels of airtightness and insulation performance all year round.
- Remains airtight during the harshest winds outside and during blower door test conditions.
- No harmful chemicals or off-gassing that pollute your home. It has 16 times less formaldehyde and 9 times less VOCs than what is considered harmless.
Questions
The shortest ladder is for floor to ceiling height of 2.68m. Is it possible to use with a lower ceiling by trimming the lowest ladder?
Yes, the ladder can be trimmed to reduce its length. Care must be taken to ensure the ladder does not become too steep to safely climb. The european loft-ladder regulations (EN 14975) require the angle of the ladder to be no steeper than 61° and that the distance of the last step from the floor is at least half as high as the distance between the other steps. Please also refer to the installation guide and Wellhöfer's cutting guide document downloadable here for details of the cutting method.
Technical Details
Key Technical Data
Installation Guide

How to Install
Please ensure you have measured the ceiling height correctly and purchased the correct attic hatch for that ceiling height.
The Wellhöfer Certified Airtight Attic Hatch, requires either a 1200 x 600mm or 1300 x 600mm opening in the ceiling. The 1300 x 600mm hatch is fitted with longer ladders (for higher ceilings) so is slightly longer. The frame of the hatch is 15mm narrower than the required opening in the ceiling. The frame size is 1185 x 585mm or 1285 x 585mm depending on the model purchased. 15mm is the required space for the sealing system to be fitted around the edges.
Choose a position between the ceiling joists and structural timbers which is suitable to accommodate the hatch. Additional timber may need adding at right angles to the joists to form noggins that frame the opening and provide structural support for the hatch when installed. The long side of the hatch should align with the joists and the short side with the noggins. Before installation begins, the perimeter of the ceiling opening must be sealed airtight to the surrounding airtightness layer. The area around the ceiling opening should be free of any obstructions like wiring or pipes etc.
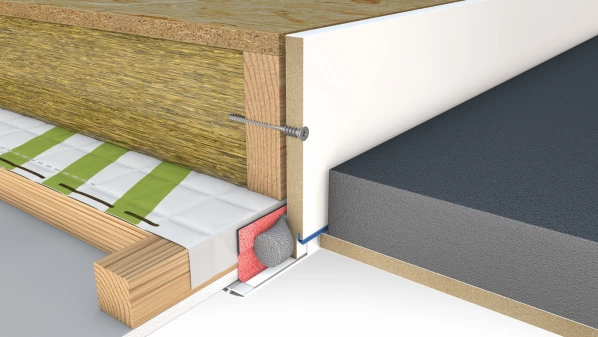
The system is supplied with a double-sided airtight tape which has a thick strip of grey coloured adhesive on one side. This side of the tape should be stuck to the ceiling opening first.
Lower the hatch into place until level and plumb with the ceiling below and secure it to the ceiling opening with screws. The strips of tubular/cylindrical insulation are then squeezed into the gap between the ceiling opening wall and hatch.
To complete the airtight seal, the second side of the airtight tape should be stuck to the hatch frame (at the bottom) and pressed down firmly. PVC architrave is added next, to hide the tape and provide a slick and clean finish.
If the installation is part of a refurbishment (retrofit), the distance between joists may not be suitable. In this situation, additional timbers may need to be fitted around the ceiling opening in order to upgrade the structural integrity of the ceiling and provide a solid material for the fixing screws.
If you are installing the hatch into a concrete ceiling, please use 8mm concrete fixings; the supplied screws are only suitable for use with timber.
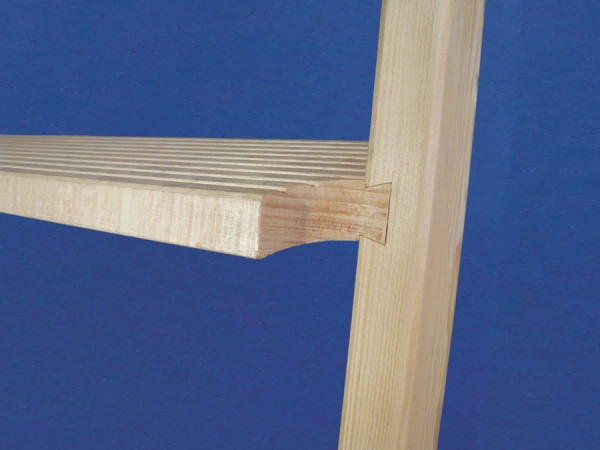
The ladder should be put in place and secured with loosely tightened bolts. You must then adjust the position of the ladder so that when it is extended, the ladder has no bend in any of its hinges. Once all three sections of the ladder form a straight line, the ladder fixings should be tightened fully. The supplied floor protection covers should then be stuck to the underside of the ladder feet.
If the height of the ceiling is up to 50mm higher or 50mm lower than you expected, the ladder can be adjusted to change the angle of the ladder and safely deal with the error. European loft-ladder regulations EN 14975 state the angle of the ladder must be no steeper than 61°. The minor adjustments for 50mm variance in ceiling height will not exceed this angle.
If the ladder is too long for your ceiling height, please re-order the correct size. Alternatively, it may be possible to cut the ladder. If you choose to cut the ladder, EN 14975 also states the height of the first step (nearest the ground) must be at least half as high as the gap between the other steps. Before cutting, the ladder should be set to medium adjustment and the lowest section should be folded back out of the way. Using a rigid straight piece of timber or large ruler, measure the distance to the floor in a straight line following the direction and angle of the upper section of the ladder. This should provide the required "new length" of the last section of ladder. Check the angle of the timber or ruler (to the floor) is not steeper than 61° and that the distance of the first step from the floor would be at least half as big as the gap between the other steps. If the angle and step distance is suitable, make the cut. The cut line must be parallel to the floor and have the sharp corner at the front cut off and angled to match the original profile (to protect the floor). Please refer to Wellhöfer's cutting instructions downloadable here.
Please note: any attic hatch that has been cut, cannot be returned or exchanged.
How to install
Hints & Tips
If cladding or panelling is added to the hatch door, the additional weight may require the spring tension to be adjusted.
We recommend lubricating the moving parts with a drop of suitable lubricant every 12 months and checking the tightness of all non-rotating/moving connecting bolts regularly.
If your ceiling opening is more than 20mm different to one of the standard sizes, a custom size can be manufactured as a special order. Custom sizes incur additional cost to manufacture and for delivery (from Germany). Custom length: 1000mm - 1600mm, custom width 600mm - 1000mm.