Tap to zoom

Tap to zoom

Tap to zoom

Tap to zoom
Tap to zoom
Tap to zoom


Pro Clima Dasatop
Product calculator


Product Overview
Main purpose
Robust intelligent airtight membrane for retrofit projects. Reacts to humidity to protect building structures from moisture all year round.
Use it on
Loft joists and rafters.
Overview
Pro Clima Dasatop is an intelligent airtight membrane for retrofit projects with a robust fleece reinforcement layer on both sides. It intelligently reacts to humidity to become more vapour open as humidity increases and less vapour open when humidity is low; the range over which Dasatop's vapour openness changes with humidity was designed specifically to suit joists and rafters. This makes Dasatop ideal for use as a sub-and-top membrane because this method means some membrane will be exposed on the cold side, above the joists, and some membrane will be under the insulation on the warm side. Only specific intelligent membranes, like Dasatop, can provide the appropriate and different levels of vapour openness at different points along its length to provide optimal protection from moisture all year round.
Where to use it
Pro Clima Dasatop can be used internally in lofts and roofs. In lofts it can be installed flat across the tops of the joists over the insulation installed between them. It can also be installed using the "sub-and-top" method which means over the tops of the joists and pressed into the gaps between each joist to create u-shaped cradles into which insulation will then be installed. When used on roofs, it is installed sub-and-top. It can be exposed to UV and the weather for up to 4 weeks during the roof refurbishment to provide temporary protection to the building prior to external insulation and permanent roof covering being installed over the top.
What it does
Dasatop is an intelligent airtight membrane that reacts to humidity to become more vapour open as humidity increases and less vapour open when humidity is low. This changing level of breathability ensures the building and insulation is protected from moisture all year round.
Pro Clima Dasatop has a thick microfibre fleece on both sides. When used in a loft (especially in older buildings) where there are rough timber surfaces and loft debris, the robustness ensures the membrane and its airtightness is not compromised during installation or by foot traffic.
When used on roofs, the sub-and-top method allows roof refurbishment to be completed from the outside without disturbing the interior of the building. This means the building occupants can remain inside the building during the work and internal redecoration is not required.
How it works
When Pro Clima Dasatop is installed over loft joists, part of the membrane is in contact with the timber of the joists and the rest is in contact with the insulation and ceiling beneath. When installed sub-and-top, the area of Dasatop in contact with the insulation is mostly on the warm side, underneath the insulation, and the area in contact with the tops of the joists is on the exterior, colder side. The contact with different materials and Dasatop's proximity to both the warmer and colder sides of the roof build-up, at the same time, mean an intelligent membrane, with its specific humidity variable range, is most suitable to provide optimum and reliable protection from moisture. Moisture moves from where it is warmer to where it is cooler. In winter this means from inside to outside; in summer from outside to inside - Dasatop copes easily with this and provides permanent moisture protection for the building at all times of the year.
Why we love it
Pro Clima Dasatop is robust so allows for a quicker installation without having to worry about minor scuffs and scrapes that might reduce levels of airtightness. This is especially useful in older loft environments where you may need to install Dasatop over rough or damaged timber joists and then walk on it. Or when you are manoeuvring (or dragging) timber for loft flooring and walkways around in the loft.
Installed as a "sub-and-top" membrane, Dasatop allows an entire roof refurbishment to be completed from the outside. This ensures the interior will not be affected by the work and the occupants can remain inside for the duration. Great in historic or listed buildings where the interior appearance cannot be modified or damaged by any refurbishment and upgrades to the roof.
As an intelligent airtight membrane you can be confident the fabric of the building and your insulation will be protected from moisture and perform to optimal levels all your round.
System warranty
Pro Clima provide a limited system warranty, backed-up with public liability insurance, for all airtightness system, roof and wall sealing system and construction products that they supply. A 10-year warranty is provided for these products when correctly installed in combination with approved thermal insulation materials and other Pro Clima system products. When correctly installed in combination with other manufacturers’ products (not made by Pro Clima), a 6-year warranty is provided.
Features
- Ideal for loft and roof retrofit projects
- Intelligent airtight membrane with specific properties designed for roof and ceiling retrofits
- Optimal moisture protection for "sub-and-top" installation
- Durable and tough fleece layer on both sides
- Can be used as a temporary weather protection layer
Benefits
- Humidity variable breathability protects the building fabric and insulation from moisture all year round
- Allows roofs to be refurbished from the outside without disturbing the interior; allowing occupants to remain in the building during the work.
- Not easily damaged by rough timbers, foot traffic, loft flooring, or contact with other surfaces when used in lofts
Questions
There are currently no questions and answers published for this product
Technical Details
Key Technical Data
Installation Guide
Find an installerPlease refer to our blog post "How to insulate your loft with natural insulation" for further information on best-practice loft refurbishment.
For additional installation guidance for the other products mentioned in this installation guide, please visit their individual product pages to read their installation guide.
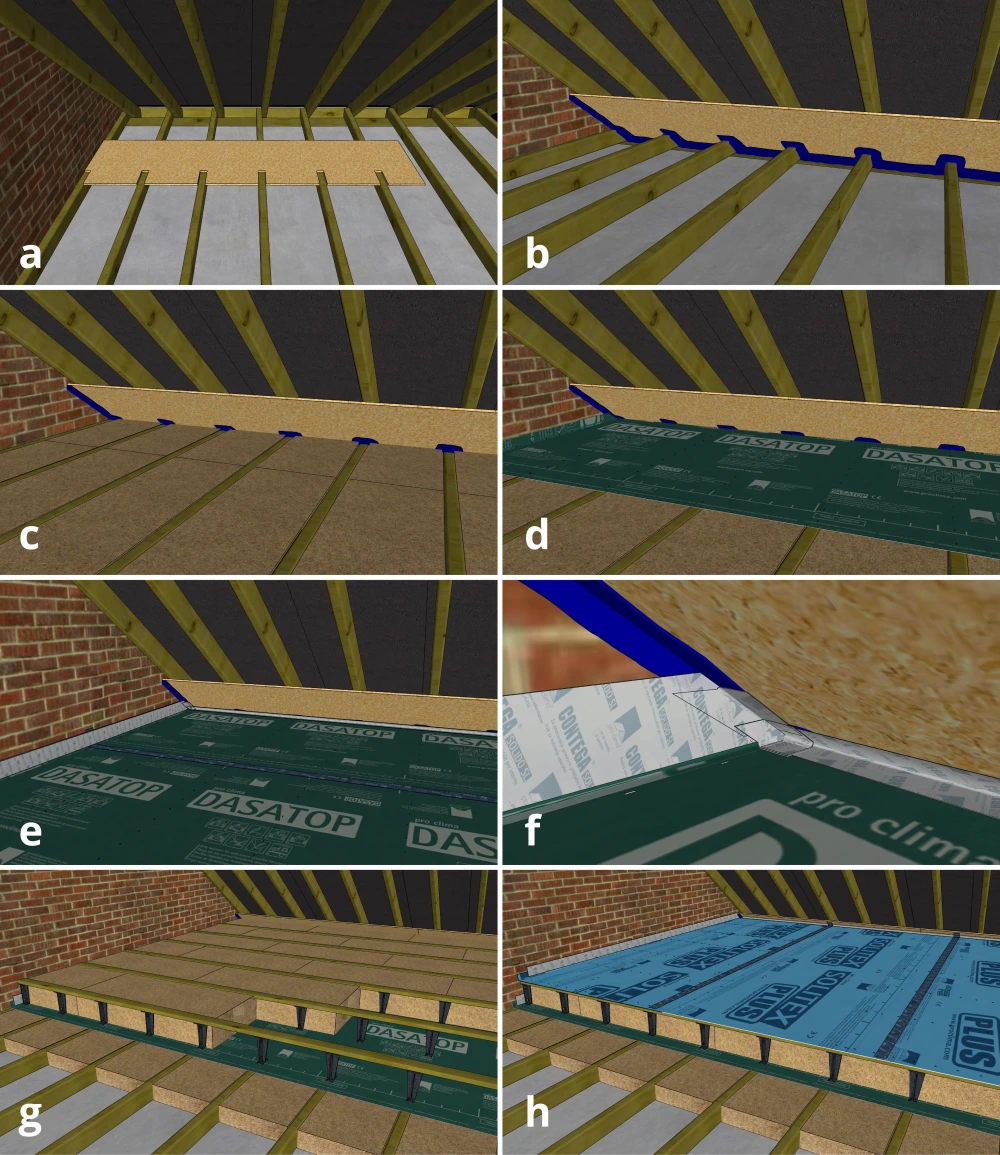
Installation in a loft. Flat installation over the tops of joists
Prepare the loft area by sweeping up debris and removing nails or sharp points where the membrane will be installed.
When installing Dasatop flat over the top of the joists, there is nothing to seal the membrane to at the eaves. To solve this problem, we recommend installing a notched timber board up against the rafters as shown in Fig 2.0a-f. The board is fixed to the rafters with wood screws. It can then be sealed to the loft floor, wall, and joists with Aerosana Visconn Fibre. This provides the easiest method for sealing the membrane at the eaves.
Dasatop should be installed parallel to the eaves which means it is usually at 90° to the direction of the joists. Measure the required length and add an additional 30-50cms to allow plenty extra membrane at the ends for sealing airtight to the gable wall. Cut the membrane to length.
Roll up the membrane and position it right in the corner near the eaves. Do not obstruct or block any ventilation gap at the eaves. Ensure the loose edge rides up the gable wall at least 40mm then roll out the full length so it is flat and parallel to the eaves without riding up the board (see Fig. 2d) . When correctly positioned, use at least 10mm wide by 8mm long galvanised staples to fix the corner of the membrane (nearest the eaves), to the first joist and then go to the far end. Pull the corner, on the same side straight and taut so there are no wrinkles along that edge and then staple that corner to the last joist.
Next move to the opposite edge in the middle between the two previous staple points and pull the membrane taut so there are no wrinkles then staple it to the joist. Next, move to each remaining un-stapled corner of the membrane and pull it taut so there are no wrinkles.
Once all the corners are taut, move to the middle (where it is not yet stapled) and pull the membrane taut and staple it. This should ensure there are no wrinkles across the surface of the membrane. Once all four corners and two centre edges are stapled, the membrane can be fixed to the tops of all the other joists (with more staples) every 10-15cm.
Repeat this process for each subsequent length of membrane being installed. Each section should overlap the previous by at least 100mm. Note there is a line printed on the edge of the membrane at 100mm so it is easy to judge where to position the next section.
If your walls are not square, your first length of membrane won't be at right angles to the joists. This is fine, you can straighten it up with the second length applied. The first and second lengths will simply have a bigger overlap at one end.
The entire length of each overlap should be sealed airtight with Tescon Vana airtight tape. Use a Pressfix tool to press firmly on the tape and achieve the best adhesion.
The edges of the membrane riding up the gable walls can be trimmed to 40mm. Ensure the wall is free of dust and debris and stable. Apply Tescon Sprimer (airtight primer) or Tescon Primer RP to the area then apply Contega Solido SL airtight tape or Orcon F airtight sealant to seal the membrane airtight to the wall.
The long edge up against the eaves board can then be sealed to the eaves board with Contega Solido SL airtight tape. No primer is required for sealing to OSB, MDF or plywood.
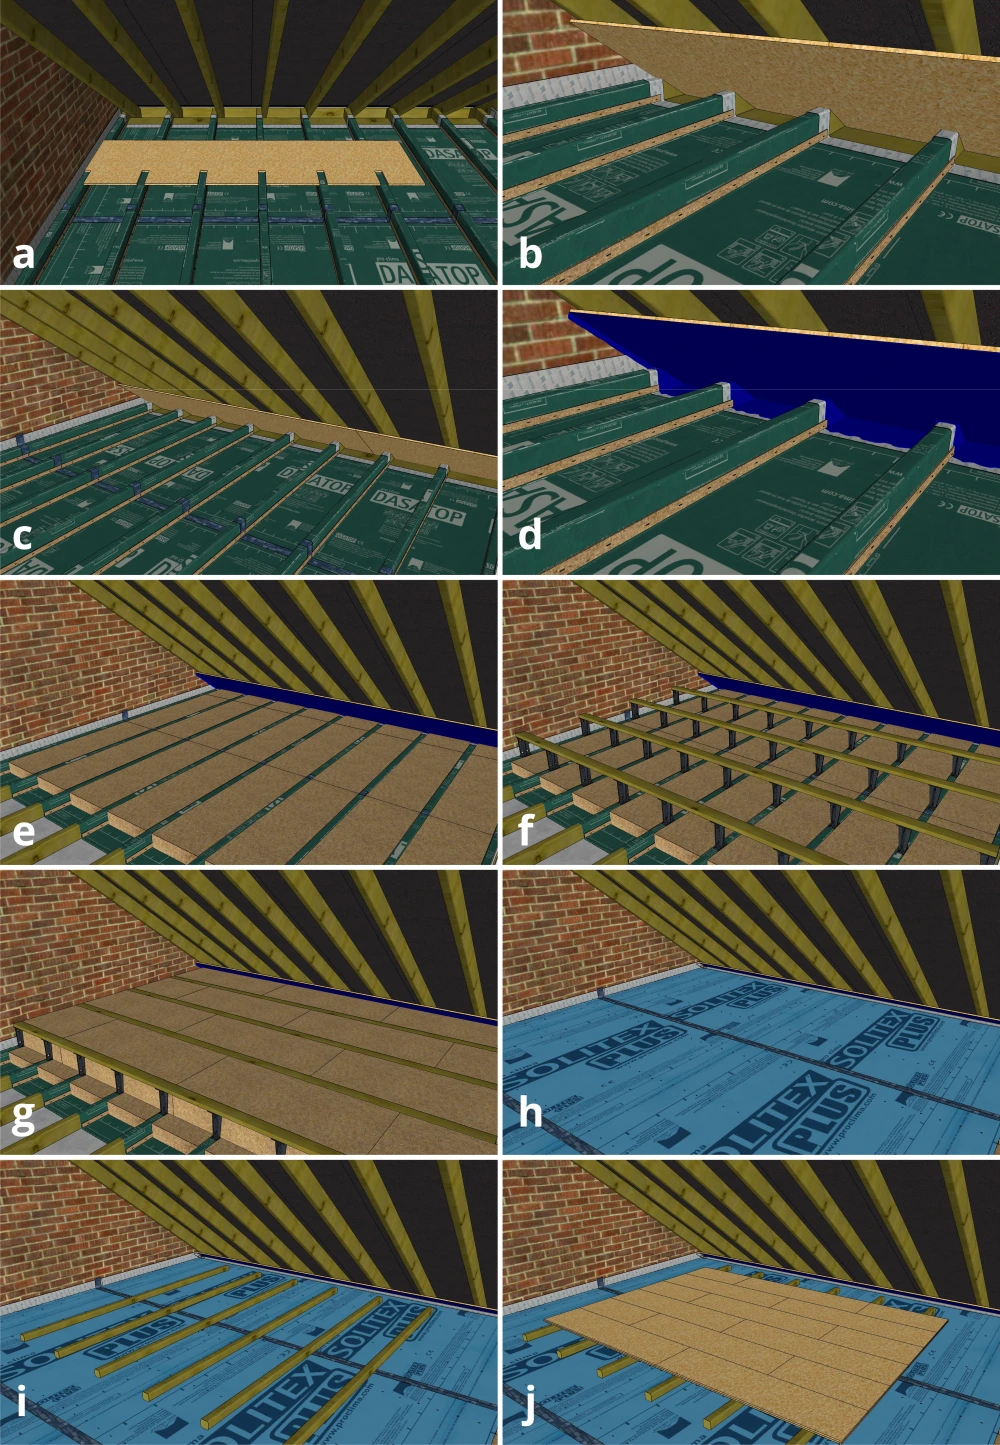
Installation in a loft: Sub-and-top method
Prepare the loft area by sweeping up debris and removing nails or sharp points where the membrane will be installed.
If you intend to install a weatherproof breather membrane such as Pro Clima Solitex Plus over the top of your loft insulation there is nothing to seal the membrane to at the eaves. To solve this problem, we recommend installing a notched timber board up against the rafters as shown in Fig 4a-d. The board is fixed to the rafters with wood screws and then sealed to the loft floor, wall, and joists with Aerosana Visconn Fibre, then painted with Aerosana Visconn airtight paint to ensure the board and any exposed loft floor is airtight. The breather membrane can then be easily taped to the eaves board.
Installing "sub-and-top" means over the tops of the joists and pressed into the corners of the space between each joist. As the membrane goes up and over each joist, you will need to estimate the amount needed by measuring the distance between the gable walls and then adding extra to account for the sides of each joist.
For a rough guess you can measure the distance between the gable walls and multiply by 1.7.
Or you can use this formula:
Length needed = distance between walls + 0.5m + ((number of joists +1) x (2x joist height))
E.g. for a 4m wide loft with 11 joists 100mm deep...
4m + 0.5m + (12x 0.2m) = 6.90m
Begin in the corner nearest the eaves board (if it is installed) and lay out your first strip of membrane parallel to the eaves. If there is a gap between the gable wall and the first joist, start by pressing the membrane into that gap. Make sure the membrane that goes up the wall extends up beyond the tops of the joists by at least 40mm so you can tape it easily later. Continue across the loft pressing the membrane into the corners of the gaps between the joists. Try and position the Dasatop so it is parallel to the eaves and at right angles to the joists (as best you can).
To secure the membrane in place, thin strips of hardboard, wooden lath or 3mm thick MDF can be applied at the bottom of each joist. The strips should be approximately 30mm wide. Pull/press the membrane taut down over the joist and deep into the corner then apply staples through the strips and membrane every 100-150mm to hold it securely in place. The strips allow the Dasatop to be tensioned without tearing at the staples to ensure the membrane is free of wrinkles and there are no air gaps in the corners underneath.
At each gable wall, if there is a gap between the joist and wall (you will fill this with insulation later), first ensure it is clear of any dirt and debris. Then push the membrane in as far as you can and staple it along the top of the joist. The membrane should go in the gap to the very bottom and back up the wall so it extends at least 40mm above the top of the joist. Prime the wall with Tescon Sprimer or Tescon Primer RP and then fix the membrane to the wall with Contega Solido SL airtight tape or Orcon F airtight sealant. Apply Aerosana Visconn Fibre to the eaves board and membrane at both ends of the gap to seal the membrane to the eaves board and make it airtight.
Roof installation "sub-and-top" from outside.
Please refer to Pro Clima's Dasatop installation guide for details on roof installation.