A Best Practice Approach To Insulating Suspended Timber Floors
Thursday 14th February 2019
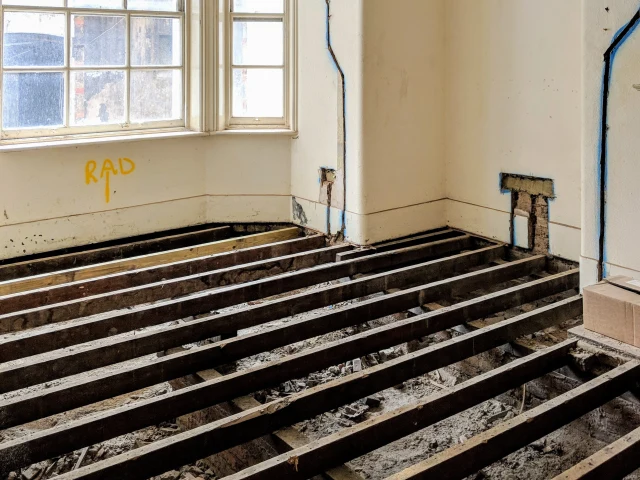
Fintan from our Technical Team discusses the thermal loss issues associated with suspended timber floors and outlines a best practice approach to tackling them.


At the turn of the 18th century, when construction techniques moved from boarded floors installed directly on the ground to suspended timber floors over a ventilated chamber, the innovation solved a significant problem. Previously, floor timbers had been prone to damp and rot thanks to their direct contact with the moist ground. Now, the free movement of air in the ventilated area between the ground and the floorboards ensured the timbers were not degraded in this way.
However, the new design technique created a different problem. The cold air under the floorboards protecting them from damp created draughts within the building and uninsulated, poorly sealed floors have made the floors of heritage properties thermally inefficient and difficult to heat ever since. In fact, heat loss through the floor can be far more significant than heat loss through either the walls or the ceiling, and yet these are often the main areas of focus for thermal improvements. Moreover, achieving a thermally efficient and airtight suspended floor by retrofitting an appropriate system comprising insulation, an airtightness membrane and a vapour control layer (VCL) can be relatively easy to achieve. If specified and carried out to best practice standards, it can improve both comfort and energy efficiency without compromising the building fabric or aesthetics of the property.

How to Insulate

For most heritage properties, the most effective and appropriate way to insulate a suspended floor and improve its airtightness is to retrofit insulation beneath the floorboards, between the supporting joists (figure 2). See our detailed installation guide for more details.
This usually involves lifting the floorboards and, providing they are in sufficiently good condition, these can be reinstated when the thermal performance improvements have been carried out. Any compromised floorboards or joists can also be replaced as part of the retrofit project. In some cases, if the floor is accessible from below, it may also be possible to partially insulate the joists from underneath, which offsets thermal bridging through timber members, but this is not often the case. The size and depth of the crawl space below the suspended floor will vary and where there is bare earth under the building it may be advisable to apply a damp-proof membrane on the ground to aid humidity control within the crawl space. The most important consideration, however, is cross ventilation within the crawl space, which must be retained by ensuring that the air vents built into the walls are not compromised or obscured in any way. The depth of the insulation should be specified to ensure that the required level of thermal improvement is provided without affecting air movement through the crawl space.
Material Selection Pitfalls
As the improvements to the thermal performance of the floor will not be visible following the project, even if the bare floorboards are left exposed, the choice of materials is not affected by listed building consent. However, many of the more commonly used insulation materials available are not ideal for suspended floor improvements for various reasons.
Conventional foil-faced, impervious (non-breathable) PIR/PUR boards are commonly used in suspended floor upgrades and this can provide some thermal performance benefits, in the short term at least. However, this approach is not ideal, due both to the inflexibility of the insulation material and its inability to enable vapour to be absorbed and gradually dispersed.


As anyone who works with heritage properties will know, it is unlikely that the joists will be straight or even, making it difficult to match the contours of a rigid board insulation to the existing timbers. This can lead to gaps which allow air leakage (figure 3), therefore reducing the thermal performance of the insulation. If the gaps are large enough, they could even allow the sections of insulation board to fall through into the crawl space and onto the ground below, rendering the insulation ineffective. Often, this issue is addressed by using an expanding foam to fill the gaps (figure 4), but this solution may only be temporary as both the installation and the hardened foam lack flexibility, so any structural movement could cause gaps to recur. The non-breathability of these materials also means that, if any moisture should penetrate the floor structure over the building’s lifetime, it will struggle to dry out.
For a more flexible solution, mineral wool is also often used in preference to rigid board insulation as this can be packed neatly between the joists, supported by chicken wire or netting (figure 5). This solves the issue of heat loss through the gaps, but the insulating properties of the material may be reduced due to ‘wind-washing’ of cold air from the crawl space through the loosely structured fibres (figure 6). Substantial amounts of air movement into and through the insulation itself can severely compromise the level of thermal improvement that can be achieved with this approach.

Best Practice Solution

For optimum results when addressing heat loss through a suspended timber floor, the specification needs to ensure that high levels of thermal performance delivered by the insulation material are combined with airtightness and moisture control, while at the same time facilitating a degree of breathability. Figure 7 shows the difference between loose fibrous insulation and the optimum approach shown on the right, achieved by protecting the fibrous insulation with membranes, similar to putting a gore tex jacket over a woolly jumper. In this way, the project achieves its objectives without inadvertently creating issues such as ‘wind-washing’ and secondary issues of damp, condensation and mould.
Ecological Building Systems have developed a proven system for thermal improvements to suspended timber floors, using a combination of advanced building fabric technologies and naturally hygroscopic insulation materials. The solution is robust enough to withstand structural movement and heavy footfall while working in unison with the existing structure, ensuring structural timbers remain in a dry, stable condition (figure 8).


The system begins with the installation of Pro Clima Solitex Plus, a windtight breathable membrane that inhibits heat loss while allowing any residual moisture within the joists to disperse, thereby preventing the risk of damp, mould and rot. The membrane is draped up and over the joists to create a cradle to support the insulation material and has sufficient strength to do this throughout the service life of the installation with no risk of sagging (figure 9).
The Solitex Plus is secured in place over the joists with galvanised staples that are at least 10mm wide and 8mm deep. Staples should be used every 10-15cm along the lower edge of the joist. Then a timber batten should be installed over the top for maximum long-term strength and durability of the installation (figure 8).
The overlaps of each length of the membrane should be taped with Pro Clima Tescon Vana, then the perimeter edge of the membrane should be sealed to the walls with Pro Clima Contega Solido SL airtight tape. The wall will need to be primed first with Pro Clima Tescon Sprimer before the Solido SL tape is applied. Pro Clima Orcon F airtight sealant can be used to seal any difficult (very uneven) areas where tape is unsuitable.
As the membrane supporting the insulation is draped up and over the joists, you will need enough membrane to cover 1.5x the square meterage of the floor. For example, if the floor is 50m², you should buy 75m² (i.e. 50x1.5) of Solitex Plus or Fronta WA to make sure you have enough.
The ideal insulation material for use as part of this system is Thermo Hemp Combi Jute a natural, breathable and high performance insulation with hygroscopic properties that allows moisture to be released gradually, helping to offset the risk of condensation within the insulation layer. Thermo Hemp Combi Jute is flexible enough to be packed tightly between the joists and can be cut to size easily on site (figure 10). The high density of the material offsets any risk of slumping over time and the lack of proteins in its natural fibres ensure it is not attractive to insects as a food source. Another alternative is wood fibre insulation, such as Gutex Thermoflex, which also offers a dense material with hygroscopic properties.


Once the natural, breathable insulation has been installed, an airtightness membrane is laid over the top (figure 11). For this we recommend the robust Pro Clima DA membrane, which is especially designed for use under foot. This prevents moisture and warm air escaping from the warm interior to the cold crawl space. Each section of Pro Clima DA should be overlapped and taped using Pro Clima Tescon Vana sealing tape.
The final and crucial element of the Ecological Building Systems solution is to seal the interface between the floor and wall (figure 12), where the Pro Clima DA membrane meets the perimeter walls, by using Pro Clima Contega Solido SL tape. The floorboards and the skirting boards can then be replaced, covering all the improvements that have been made. To summarise, this solution ensures energy bills are reduced and comfort levels are optimised, without compromising the character or integrity of the floor for decades to come.
For more detailed installation information on how to install underfloor insulation using this method, please see our best-practice installation guide.

Who can install this for me?
We supply the products mentioned in this blog post and can provide technical support whenever you may need it. But, we don't provide an installation service for the methods described above.
If you don't wish to do this as a DIY project, we would recommend you find a local joiner/builder that you are happy to work with and ask them to do the installation for you. We are happy to confirm or clarify the installation methods with them via our technical support team.
Please note: we don't have a list of recommended installers that we can send you; you will need to find a tradesperson locally yourself.
Alternatively, you could make this a DIY project. Often the best installations are completed by homeowners who have taken time to install materials correctly. The most important skill needed is care and attention to the intricate details. You must also follow the appropriate health and safety measures at all times. We would be pleased to support you with further installation information if DIY is an option for you.
A more detailed step-by-step installation guide is available or you can download the PDF version of it here.
Frequently Asked Questions
Can I install the system described in the blog myself?
Yes, many homeowners undertake this installation as a DIY project. It depends on the experience and tools available to you. Follow this guide for more detailed instructions. The most crucial element is to be conscious of all the intricate details and to execute the details with care. Often the best installations are in fact by homeowners who have taken time to install materials correctly. Of course, appropriate health and safety measures must be taken.
Can you recommend a local installer?
As a product supplier only, we don’t get involved with installation or work directly with installers of suspended timber floor insulation. However, if you are able to find a local joiner/builder that you’d like to work with, we’d be more than happy to confirm the details with them if that would help?
How do I know what size and thickness of Thermo Hemp Combi Jute insulation I require?
Thermo Jute is available in two different widths, either 375mm for joist centres that are around 400mm apart or 575mm for joist centres that are around 600mm apart. Thermo Hemp Combi Jute is available in different thicknesses. Standard thickness that we stock include 60mm, 100mm and 140mm in 370mm wide and 40mm, 60mm, 100mm in 580mm wide. We’re able to use a combination of these thickness to make up the total thickness required. The thickness of the insulation required is normally determined by the height of the floor joists, so if the height of the floor joist is 160mm, then we would recommend using 160mm of Thermo Hemp Combi Jute insulation to fully-fill the void. The total thickness could be a combination of 100mm and 60mm thicknesses on top of each other. For details on the other natural fibre insulations we supply, please refer to our Flexible Insulation category page.
What is the approximate per m² cost of the materials outlined in the blog?
Following best practice, as described in the blog, the average cost to UK customers for the Pro Clima airtight membranes, tapes and other products plus the natural breathable insulation needed to fully fill joists with 375mm wide 100mm thick Thermo Hemp Combi Jute, is approximately £43.00 per m² excluding VAT and Delivery. This cost is based on UK prices in July 2022 and may be subject to change.
What is the best way to cut Thermo Hemp Combi Jute if I need to?
Thermo Hemp Combi Jute or other natural fibre insulations can be easily cut with a large serrated knife or a manual insulation saw like this Bahco Profcut. It can also be cut with a mechanical saw like this.
If I choose to not use either a top and/or bottom membrane, and only use Thermo Hemp Combi Jute or similar flexible insulation with netting to secure it, will I get similar insulation benefits?
We would always recommend the use of a windtight breather membrane on the underside of the joists. Its purpose, similar to that of the netting is to support the insulation in the long term, however, where the membrane really comes into its own, is by being completely windtight and still fully breathable.
The Solitex Plus external membrane will prevent any wind and air movement from underneath the joists from moving its way through the insulation, which will significantly reduce its thermal performance. Allowing air to move in and through the fibrous Thermo Hemp Combi Jute insulation means that the effective trapped pockets of insulating air are moved away and can result in a big drop off in thermal performance and comfort. This effect is called wind-washing or thermal bypass.
Ideally with any building element, be it a roof, wall or floor, we would always recommend an airtight vapour control membrane on the warm side of the insulation. For floors, the robust DA membrane is most suitable as an airtight vapour control layer, the membrane also stops dust and debris falling into the insulation. With a windtight breathable membrane on the cold side, a robust airtight membrane on the warm side and the joist space fully-filled with Thermo Hemp Combi Jute fibrous insulation, the insulation has adequate support over the lifetime of the building and will achieve its best and optimal thermal performance.
Which way up should the membranes be installed?
For Solitex Plus, when installed on a suspended timber floor, there is no UV exposure, so the blue face should be positioned so it is the side that gets taped. This means, if the floorboards have all been removed and you install from above the floor, the printed blue side will face up (towards the interior of the room). Conversely, if the floorboards remain in-place and you install from within the crawl space underneath, the blue side will be facing down towards the earth. Taping should always be done onto the blue face as it is smoother and an ideal surface for airtight tape.
The same is true for the DA membrane; tape the side you can see and make sure you position it so that would be the dark green face for the DA.
Blog author

Fintan Wallace
Architectural Technologist (Bsc Hons, CEPHC, CEPHT)
Fintan Wallace is an Architectural Technologist at Ecological Building Systems. Graduating from Dublin Institute of Technology in 2011 with a B.Sc (Hons) in Architectural Technology, it was here in D.I.T’s Bolton Street where Fintan developed a strong interest in low energy and Passivhaus design. From here he continued his studies becoming both a Certified European Passivhaus designer and tradesperson. Fintan has travelled to Baden Württemberg in Germany to study passive housing and sustainable energy technology, gaining significant knowledge regarding the use of natural insulations in timber frame and solid wall constructions. Fintan has been involved extensively in a deep energy retrofit of a property to the Enerphit standard in the west of Ireland and now advises on numerous projects throughout the UK for newbuild and retrofit.