0
Basket
×
Ecological Building Systems

You are shopping in

The “GB” region can deliver orders to England, Scotland and Wales. For Northern Ireland deliveries, please choose the “Ireland” region.

Your region is: Great Britain Not right?

How to build a Low Energy Shepherd’s Hut

Phil Martin

By Phil Martin

Friday 22nd July 2022

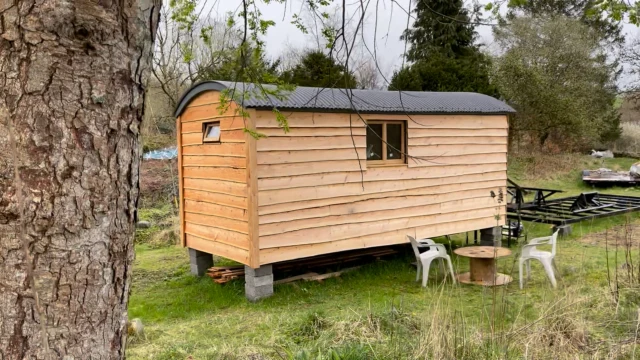
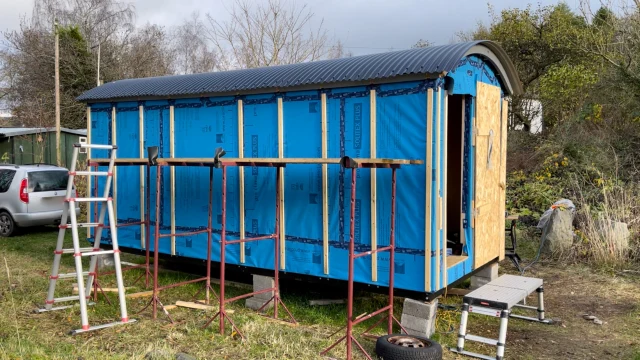
Here's how a standard shepherds hut kit can be turned into an energy efficient small home that has a comfortable internal temperature all year round. 

How to build a Low Energy Shepherd’s Hut How to build a Low Energy Shepherd’s Hut

Originally used by English shepherds as a resting place when moving herds of sheep across pastures, shepherd’s huts are becoming a popular alternative to sheds or caravans, offering a beautiful garden space, a trendy glamping retreat, or even a minimalist living option. 

While their off-grid nature makes shepherd’s huts an appealing option for those looking for an eco-friendly small space living solution, they must be carefully designed to ensure they’re able to maintain a comfortable temperature, retaining heat in winter without overheating in the summer months. 

Diane Hubbard, an independent energy consultant at Green Footsteps, talked us through the process of building her own low-energy shepherd’s hut in beautiful rural Cumbria.

Video series

You can also see how Diane approached her shepherd’s hut build in our video series:

Episode 1 - Introduction

Episode 2 - Insulation

Episode 3 - Weatherproofing

Episode 4 – Finishing touches

The situation

As a Passivhaus consultant herself, Diane was working on her own Passivhaus build and needed temporary accommodation during the construction period.

She considered a caravan, but was put off by their issues with temperature control, leading to overheating in summer and condensation in the winter. 

As her sister had been talking about building a shepherd’s hut, Diane decided to build one herself, and pass it on to her after her Passivhaus project was complete.

Diane’s goals 

While Diane was not aiming for full Passivhaus performance for her shepherd’s hut, she did want to ensure her build was reasonably airtight and energy efficient, with reasonable U-values. While the goal wasn’t to achieve Passivhaus standards, Diane was keen to ensure that she didn’t have to deal with condensation issues while staying in her hut over the winter.

Approach

Diane decided to start with a pre-cut shepherd’s hut frame, and then add insulation and a windtight outer layer to keep the inside cosy. Conscious of her carbon footprint, Diane was also keen to use natural materials where she could.

Products used

Diane used the following products in her shepherd’s hut build:

The frame

Diane used a pre-cut frame for her shepherd’s hut – the vertical ribs have grooves into which the horizontal sections simply slot into place for an easy initial build.

The pre-cut shepherd’s hut frame.

Insulation

Diane chose a wood fibre insulation – Gutex Thermoflex – for her build. The benefit of Thermoflex is that it has a high thermal mass, meaning that it takes a lot of energy to heat it up, and that it’s not as susceptible to overheating as alternatives like, rock wool or PIR-type insulation. 

The Gutex Thermoflex insulation was simply cut to shape and slotted into the spaces in the shepherd’s hut frame. Diane used two layers of 40mm Gutex Thermoflex: 


Gutex Thermoflex wood fibre insulation is added between the frame’s ribs.

Weatherproofing

Diane coated her shepherd’s hut frame with Gutex Multiplex Top, a breathable water and wind resistant insulated woodfibre board. While this is a sarking board designed for roofs, Diane chose to use it vertically on the outside walls of the timber frame to add additional thermal resistance externally. This ensures thermal bridging through the timber of the frame itself is reduced.

Gutex Multiplex Top board, covered with a Pro Clima Solitex Plus airtight membrane (before taping).

Usually Solitex Plus is installed horizontally, Diane found shorter vertical lengths were easier to install with the ladders she was using.

Pro Clima Solitex Plus airtight external membrane.

While Multiplex Top may be left exposed, due to its watertight and airtight tongue and groove edge joints, it must still be primed and taped wherever it is cut. Applying Solitex Plus over the top makes a continuous weathertight layer easier to achieve and makes airtight taping around windows and doors much simpler.

At the membrane junctions, Diane used Pro Clima Tescon Vana airtight adhesive tape to seal the Solitex Plus membrane.

Pro Clima Tescon Vana tape along the vertical Solitex Plus overlaps.

While the majority of the taping is vertical joins, the ribs at the top of the shepherd’s hut walls formed an angle, requiring some more complex taping:

Taping pattern for the angled ribs at the top of the walls.

Exterior cladding

On top of the membrane, battens are attached to support the exterior cladding. The screws that attach the battens to the frame are the only perforations in the Solitex membrane.

To maintain water and windtightness Pro Clima Tescon Naideck nail sealing tape is applied to the back of the battens, helping to tension the membrane as well as acting as a gasket where the screws go through it.

Pro Clima Tescon Naideck is applied underneath the external battens.

The wide external larch cladding boards were sourced from a local mill a few miles from the build site to the west of Lake Windermere. They’re left untreated and fixed into place on the external battens.

Locally sourced larch cladding boards being applied as a final outside layer.

The Roof

Diane added a layer of plywood over the roof of the shepherd’s hut frame to support the Solitex Plus windtight membrane, which also covers the top of the hut. She added Gutex Thermoflex – 100mm thick this time – in the spaces between the timbers of the roof area and filled all other gaps with more Thermoflex.

Plywood roof layer and 100mm Gutex Thermoflex insulation.

Outside, the Solitex Plus windtight layer is covered by a corrugated roof:

The corrugated shepherd’s hut roof, on top of a Pro Clima Solitex Plus airtight membrane.
The finished internal ceiling.

Interior walls

Inside the shepherd’s hut, Diane installed Pro Clima Intello Plus vapour check membrane on the inside of the ribs, followed by a layer of 6mm decorative plywood.

She used Pro Clima Contega Solido SL airtight membrane to door and window sealing tape at the junctions to maintain an airtight layer – while elsewhere in the build she’s used Pro Clima Tescon Profil, which is great in corner junctions. Diane chose Solido SL for this part of the job because of its extra width.

The internal plywood finish, with taping at the junctions.

Floor

The floor is an 18mm plywood, sealed to the wall panels using Pro Clima Tescon Profil tape. The split in the tape makes it easy to fold and seal one half to the floor and the other half behind the plywood wall.  Underneath, there is a Solitex Plus Windtight breather membrane fitted to the bottom of the floor joists externally with 100mm Gutex Thermoflex in between the joists.

Pro Clima Tescon Profil tape to seal the junctions in the plywood floor.

Interior Ceiling

Diane made two attempts at the ceiling – her first idea was to use a 6mm plywood bent into shape, but this didn’t work as she’d hoped. Instead, she’s applied tongue and groove boards on top of Pro Clima Intello Plus. The boards are nailed into place, holding the membrane in between them and the main structure tightly (to minimise air leakage around each nail). Fitting battens between the Intello Plus and the ceiling cladding is typical best practice, but was less practical on a curved ceiling and would have reduced the finished ceiling height in such a small space.

Tongue and groove boards placed on top of Pro Clima Intello Plus.

Windows and doors

The windows are oak-framed, with a temporary layer of Pro Clima Tescon Vana preventing rain ingress until the door and window surrounds are completed.

Temporary window seal using Pro Clima Tescon Vana.

The door is also temporary, and will be replaced with a half-glazed door to let some light in. Concerned about overheating inside, Diane has been careful not to over-glaze the hut.

Temporary door – to be replaced with a half-glazed model.

Finishing Touches

The internal plywood on the walls also functions as an airtightness layer, but to improve the appearance, Diane has added grooves to simulate a tongue and groove appearance.

Simulated tongue and groove effect on the internal plywood walls.

The finished shepherd’s hut

 While there are a few details left to complete, Diane was able to move into her shepherd’s hut and was delighted with the results. 

“I’ve absolutely transformed a small space, and it’s genuinely inspired me”, said Diane. “I look and think - look at what we’ve achieved, isn’t that wonderful!


The completed shepherds hut
Reclaimed and upcycled stairs
Interior of the shepherds hut

Blog author

Phil Martin

Phil Martin

Web Solutions Manager

Related Products

Read More

Blog

Diathonite Thermal Plaster - a Complete Guide

Read more
Blog

Passivhaus Tour - Passive House Insulation Series Conclusion (part 13)

Read more
Recently viewed products

This website uses cookies to ensure you get the best experience on our website. 

View our cookie policy here.