


Redstone Clima Redboard Pro Tapered Board
 Certification")
")
Product calculator
Product Overview
Main purpose
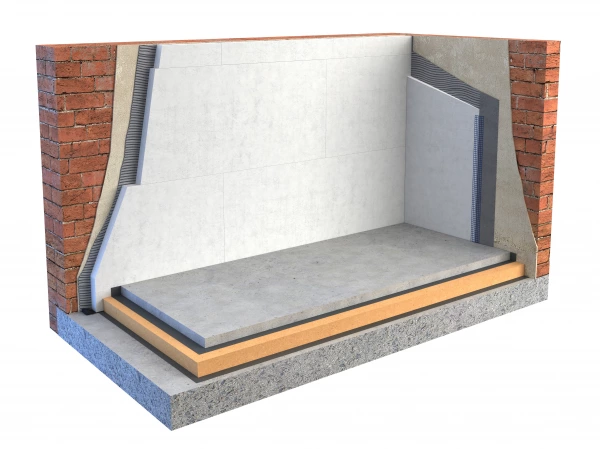
Eliminating cold corners (thermal bridges) on internal walls and ceilings where the external wall is insulated with Clima Redboard Tapered Boards. Also minimises the visual impact of Clima Redboard Pro insulation on walls with ceiling cornices.
Use it on
Level internal walls or ceilings that adjoin an external wall insulated with Clima Redboard Pro. Can also be used on solid external walls directly under a ceiling cornice.
Overview
Clima Redboard Tapered Board has two main uses. One is to eliminate thermal bridges in corners where uninsulated internal walls and ceilings adjoin with an insulated external wall. The other is to ensure beautiful ceiling cornices on walls, insulated with 30mm Clima Redboard Pro look their best by tapering the insulation up to the cornice rather than using full thickness boards right up to the edge.
Features
- Tapered profile
- Insulates thermal bridges
- Capillary active
- Helps eliminate mould growth
Benefits
- Blends-in to the wall from corners and at cornices to minimise the visual impact of the edge of thick insulation boards.
- Insulates thermal bridges effectively without compromising the aesthetic appearance of interior walls.
- Allows moisture in the wall to rapidly evaporate minimising the risk of condensation.
- It's high PH reduces mould growth, improving indoor air quality.
Questions
There are currently no questions and answers published for this product
Technical Details
Key Technical Data
Installation Guide
How to Install
Clima Redboard Pro Tapered Board is primed on the smooth side so that the finishing plaster adheres perfectly. The reverse side is textured and this will be the side that is stuck to the wall with Clima Redboard Pro Adhesive Mortar.
Clima Redboard Pro Tapered Boards should be installed on to a level surface where all gypsum plaster has been removed. Any firmly attached cement or lime-based plaster may remain in place. All non-breathable paint and wallpaper must be removed prior to application. If the wall is uneven, use a lime-based plaster or Diathonite (for additional insulation) to level it before installing Calsitherm. Any mould on the stone/brick should be cleaned off before applying the levelling coat.
Apply Redstone Clima Redboard Pro Adhesive Mortar to the corner and on to the internal wall with a 10mm (or wider) notched trowel. The thick edge of the tapered board should be in the corner and the thin edge should extend into the room. Ensure there is no gap between the Clima Redboard Pro on the external wall and the edge of the tapered board. This may require the edge of the tapered board to be cut or contoured to match the angle of the wall. Apply the board pressing it tightly into the corner. For optimum performance, the board must be completely bonded to the wall or ceiling with no air pockets behind.
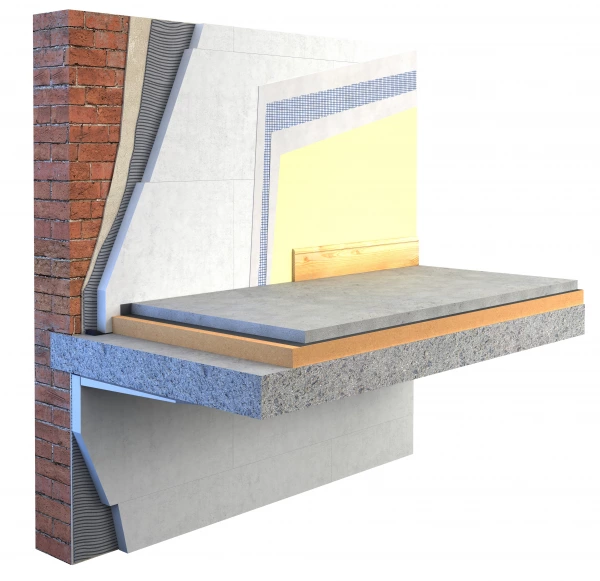
Clima Redboard Pro Tapered Boards should be finished with a layer of Clima Redboard Pro Finishing Plaster (KP Kalkglatte), then Clima Redboard Pro Reinforcing Mesh to overlap the adjacent wall, then a second coat of Finishing Plaster. In order to optimise the performance of the Clima Redboard Pro System, the final top layer should be a breathable paint such as Auro natural paint. If you wish to use ceramic tiles on the wall, at least one third of the area insulated with Clima Redboard Pro must be left un-tiled so the system can continue to work effectively. Wallpaper is not suitable for use over Clima Redboard Pro.
Hints and Tips
Where the timber studs of an internal wall meet external walls, we recommend removing the studs (and part of the wall) so a continuous run of Clima Redboard Pro boards, with no gaps, can be installed on the external wall. Once that is done, the internal wall can be reinstated. The internal wall and studs will then be in contact with Clima Redboard Pro (rather than cold masonry) so the potential for a thermal bridge can be avoided.
Ceramic Tiling on top of Clima Redboard Pro
If you wish to use ceramic tiles on the wall, at least one third of the area insulated with Clima Redboard Pro must be left un-tiled so the system can continue to work effectively. Wallpaper is not suitable for use over Clima Redboard Pro boards.
In bathrooms/wet rooms on walls outside shower area:
- Apply first layer of Luno Kalkglätte (Luno Smooth Finishing Plaster) with the Reinforcing Mesh
- Then apply 4 insulation fixings per m2 to ensure the boards are bonded and mechanically fastened to the wall. Redstone recommend the Fischer TermoZ CN 8 or similar approved.
- Then apply the second layer of Luno Kalkglätte (Luno Smooth Finishing Plaster)
- Following this the tile adhesive and tiles may be applied.
In bathrooms/wet rooms on walls inside an enclosed shower/bath area:
- Apply first layer of Luno Kalkglätte (Luno Smooth Finishing Plaster) with the Reinforcing Mesh
- Then apply 4 insulation fixings per m2 to ensure the boards are bonded and mechanically fastened to the wall. Redstone recommend the Fischer TermoZ CN 8 or similar approved.
- Apply a waterproofing system such as the following: Sopro AEB 640: AEB® waterproofing and separating membrane.
- For detailed application instructions for the waterproofing system specifiers must refer to the manufacturers technical datasheet e.g. Sopro AEB 640 (how to apply a suitable tile adhesive to their system)
- The tiles now can be applied directly on the AEB 640