0
Basket
×
Ecological Building Systems

You are shopping in

The “GB” region can deliver orders to England, Scotland and Wales. For Northern Ireland deliveries, please choose the “Ireland” region.

Your region is: Great Britain Not right?

Suspended Timber Floor Insulation: From Above Installation Guide (Method 1)

Dave Judd

By Dave Judd

Wednesday 28th July 2021

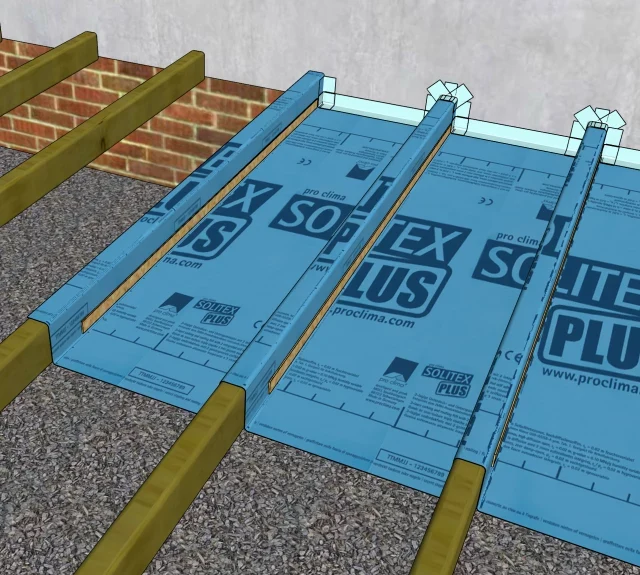
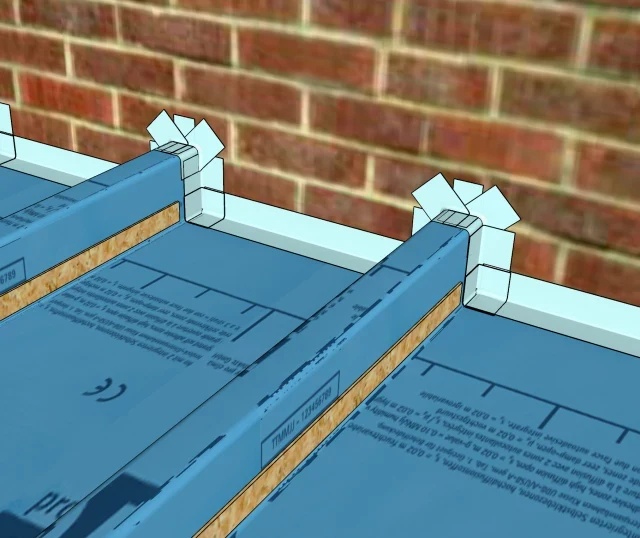
This step-by-step guide provides all the detail needed for a successful installation of underfloor insulation. Written as a follow up to our popular blog "A Best Practice Approach To Insulating Suspended Timber Floors".

Suspended Timber Floor Insulation: From Above Installation Guide (Method 1) Suspended Timber Floor Insulation: From Above Installation Guide (Method 1)

Method 1 (Installation from above with floorboards removed)

Before proceeding, check the moisture levels under the floor. Joists must be dry and any rotting timber must be replaced before beginning work. Please contact us for advice if the ground/soil below is visibly damp or wet or likely to flood.  

Once the floorboards and skirting boards have been removed, inspect the joists for any exposed nails or sharp points that could puncture the membrane then remove or rectify any problems, as necessary. 

The insulated floor will no longer allow warmth from the room to warm the space underneath. This means water or heating pipes under the floor should be insulated with appropriate lagging to prevent freezing.    

Check all air vents. They must all work properly, be open, unobstructed and provide good ventilation to the space.

If removal of the floorboards and skirting is not practical, the installation can be done from underneath (method 2). Please contact our technical team for details.

If you have any questions not answered by this installation guide, please contact our technical team by calling +44 (0) 1228 711 511 (UK) or +353 46 9432104 (Ireland) or email info@ecologicalbuildingsystems.com.

For essential background information on insulating a suspended timber floor, read our blog on the subject here.

We also have a guide for "Method 2", which covers how to insulate the floor from underneath, without removing floorboards.

DOWNLOAD this guide as a PDF.

Install Windtight Breather Membrane, Pro Clima Solitex Plus (laying out and initial fixing with staples)

The windtight reinforced breather membrane Solitex Plus should be installed at right angles to the joists (Fig. 1).

It should be laid over the top and down the sides of each joist to form a basket into which the insulation can sit. The smoother blue printed side of the Solitex Plus should be facing up towards the room; this is the side that is ideal for taping.


Fig. 1

The very first length of membrane should be positioned so it is up against the wall (parallel to it) with as little gap as possible between the wall and membrane. Where the wall is not perfectly straight, you can cut the membrane around any obstacles and make it follow the contour of the wall. You need to make sure the membrane does not go up the wall at any point (Fig. 2).  This makes it easier to make the membrane taut in a later step and easier to tape to the wall when you are done.

Fig. 2

If your walls are not square, the first length of membrane (laid parallel to the wall) may not be at right angles to the joists. This is fine, because the next length can be installed at 90° to the joists and overlap the first to correct any problems (Fig. 3).

Where the Solitex Plus meets the adjacent walls (the ones parallel to the joists), it should extend up the wall by approximately 300-500mm so it can be easily trimmed to the correct size and sealed to the wall later.

Fig. 3

If Pro Clima Solitex Fronta WA windtight breather membrane is used instead of Solitex Plus, the exact same method should apply. Note, the black printed side of Fronta WA should face up and that is the side to be taped.

Fig. 4

The Solitex Plus should be held in place with 8mm deep x 10mm wide galvanised staples added to the top and sides of each joist approximately every 300mm. These staples are not the final fixings for the membrane; they simply hold the membrane in position as you work from one end of the room to the other. The Solitex Plus does not need to be taut at this point; just try to ensure it is not saggy (Fig. 4). 

Any staples that do not go all the way in or miss the joist should be removed and taped over with Tescon Vana airtight tape to prevent any potential air leakage.  

The second length of membrane should then be laid out at right angles to the joists. As the first length is parallel to the wall, you may need to have a bigger overlap at one end to make sure the second length goes on at right angles to the joists (see Fig. 3).

As you lay down more lengths of Solitex Plus, overlap each by 100mm. There is a line printed on the edge of the Solitex Plus to help you judge the correct overlap width (Fig. 5).

Fig. 5

Pipe and Cable Penetrations

If there are any pipes or cables passing through the floor where the membranes will be, they will need to be sealed to each membrane with a Pro Clima Kaflex Post Airtight Retrofit Grommet (Fig. 6) or with some carefully applied Tescon Vana.

Fig. 6

The Kaflex Post Grommet wraps around the pipe or cable so can be installed onto any pre-existing pipe or cable.

The Pro Clima Kaflex or Roflex Grommets (Fig. 7) are suitable if one end of the pipe or cable is accessible for you to slide the grommet onto. When upgrading a floor, the pipes and cables are usually already connected to something at both ends and inaccessible, so the Kaflex Post Grommet will be the most convenient choice.

Fig. 7

Seal overlaps in Solitex Plus

Once the entire floor area is covered with Solitex Plus, all the overlaps should now be sealed windtight with Pro Clima Tescon Vana airtight tape (Fig. 8).  

A Pressfix Tool should be used to press the tape into the membrane surface and achieve maximum adhesion.

Fig. 8

Final fixing of Solitex Plus to joists

Once the overlaps are sealed and fully windtight, thin strips of hardboard, wooden lath or 3mm thick MDF can be fixed (with staples) on top of the Solitex Plus along the bottom edge of each joist (see fig. 9). These strips make it easy to pull the membrane taut (without tearing it) and help form a flat-bottomed cradle between the joists.  The strips should be approximately 30mm wide. Staple through the strip and membrane every 100-150mm to hold the Solitex Plus tightly in place up against the joist. The staples must go all the way through the strip and hold it tight up against the joist to be permanently airtight.

Fig. 9

Staples can be used on their own to tighten the Solitex Plus membrane, but this can increase the risk of tearing at each staple point which leads to lower levels of windtightness.  The optimum thermal performance of the floor is achieved by preventing any wind-washing of the insulation layer due to draughts coming from the well-ventilated crawl space below. 

Please note: If your joists are very deep (more than 140mm) you may not wish to fully fill that space with insulation. In that case, it is important to position the Solitex Plus so the cradle formed is only as deep as the insulation you will be using (see Fig. 10).

Fig. 10

Seal the Solitex Plus (Walls parallel to the joists)

On the walls that are parallel to the joists, the Solitex Plus edges must be sealed airtight with Pro Clima Contega Solido SL airtight tape. First trim the Solitex Plus with a sharp knife so there is approximately 30-40mm of it on the wall; This will ensure the membrane is not too far up the wall and that there is enough room to seal the vapour control membrane in the next step and cover it all up with skirting board when complete (Fig. 11).

Fig. 11

Before applying the Solido SL tape, the wall will need to be clean, free of dust and debris and primed with Pro Clima Tescon Sprimer or Tescon Primer RP before the Solido SL tape is applied (Fig. 11).  Pro Clima Orcon F airtight sealant can be used (with primer first) to seal any difficult or very uneven areas where tape is unsuitable. 

Use a Pressfix Tool to fully press the tape to the wall and achieve maximum adhesion.

Seal the Solitex Plus (Walls at right angles to joist)

First ensure the wall is clean, free of dust and debris and is primed with Pro Clima Tescon Sprimer or Tescon Primer RP.  Apply the primer to the areas where tape will be applied (the shaded area of Fig. 12).

Fig. 12

Measure the width of the bottom and the height of the sides of the U-shaped Solitex Plus cradle between each joist. Cut lengths of Solido SL airtight tape to match those dimensions.  Apply the tape to seal the bottom of the cradle, then apply tape to seal the sides (Fig. 13).  

Fig. 13

To seal the bottom corners, cut an 80mm length of Solido SL then make a cut in the middle of the edge with the 20mm release strip. Remove the 20mm release paper on one side of the cut and fold the tape, with the fleecy side inwards, and press together forming it into a corner shape. (Fig. 14 steps 1-8).

Fig. 14

When ready to install, remove the remaining release paper (Fig. 14 steps 9-11) from the corner shaped tape and carefully press one into each corner (Fig. 15).  

Several corner shapes can be prepared in advance if you find that easier. 

Fig. 15

Next seal at the tops of the joists with more Solido SL. Tape the horizontal top with a piece of Solido SL as wide as the joist, then cut two more similar sized pieces and apply diagonally, stretching it around each corner to complete the seal (Fig. 16).

Fig. 16

Install Natural Thermo Hemp Combi Jute insulation

The space between the joists can now be fully filled with Thermo Hemp Combi Jute natural insulation.  Filling the space with no air gaps will maximise the thermal benefit of the insulation.  Use offcuts for filling any gaps that remain once all the mats have been installed. It is very easy to tear the natural insulation into smaller pieces to fill small gaps (Fig. 17).

The Thermo Hemp Combi Jute, should be installed slightly oversized to ensure a good friction fit between the joists. The width of insulation used should therefore be 20-40mm wider than the measured gap between the joists. When slightly oversized, the insulation is compressed slightly and pushes against the sides of the timbers, meaning it will stay in place better without slumping. Compression of up to 10% will not affect the thermal performance.

Fig. 17

As natural insulation is very hard to cut with a knife, we strongly recommend using a Bahco Profcut Insulation Saw (Fig. 18) to create clean straight cuts with minimal effort. The saw is supplied with a sharpener and should be resharpened regularly to continually provide perfect cuts.  The Profcut Insulation Saw is perfect for precise cutting making it easier to achieve a good friction fit for the insulation.

Fig. 18

Things to look out for …

Please check the installation for the following problems, it is best to rectify any of these before installing the final membrane over the top.

Fig. 19

Install Airtight Vapour Control Membrane – Pro Clima DA

Once the space between the joists is fully filled with Thermo Hemp Combi Jute, the airtight vapour control membrane, Pro Clima DA, should be installed over the top of the insulation.

The dark green side of the membrane should face up towards the ceiling.  Lay the DA membrane over the insulation at right angles to the joists (in the same direction as the Solitex Plus).  Make sure the DA membrane extends up the wall approximately 200mm (see Fig. 21). The DA membrane should be pressed into the corner so there is minimal curve between the wall and floor (see Fig. 20).

Fig. 20

Staple the DA to the tops of the joists approximately every 150mm (Fig. 22).  Make sure each staple goes into the joist, any that miss the joist should be removed and taped over with Tescon Vana to maintain the airtightness.  

As you lay down more lengths of DA membrane, overlap each by 100mm. There is a line printed on the edge to help you judge the correct overlap width.  The overlaps should then be sealed airtight with Tescon Vana. Use a Pressfix Tool to press the tape onto the membrane and achieve maximum adhesion.

Fig. 21
Fig. 22

Seal Pro Clima DA membrane to the walls

Make note of where your skirting boards will be and trim the DA membrane so it will be at least 50mm below the top of the skirting. This allows for 40-50mm of Solido SL tape to be applied to the wall without it being visible once the skirting has been re-installed (see Figs. 23 and 24).

If the skirting will be fixed to the wall with screws, be mindful of where the screws will go so you can avoid having to screw through the membrane when securing the skirting.

Fig. 23

The perimeter edge should then be sealed to the wall with Solido SL airtight tape. Pro Clima Orcon F airtight sealant can be used to seal any difficult (very uneven) areas where the tape is unsuitable. Before applying the Solido SL tape or Orcon F sealant, the wall will need to be clean, free of dust and debris and primed with Pro Clima Tescon Sprimer or Tescon Primer RP.

Fig. 24

Final steps

The floor is now ready for the floorboards and skirting to be reinstated. 

This computer-generated cut-away view (Fig. 25) shows how all the layers of the completed suspended timber floor build-up will look when complete.

Fig. 25

Who can install this for me?

We supply the products mentioned in this blog post and can provide technical support whenever you may need it. But, we don't provide an installation service for the methods described above. 

If you don't wish to do this as a DIY project, we would recommend you find a local joiner/builder that you are happy to work with and ask them to do the installation for you.  We are happy to confirm or clarify the installation methods with them via our technical support team. 

Please note: we don't have a list of recommended installers that we can send you; you will need to find a tradesperson locally yourself.

Alternatively, you could make this a DIY project. Often the best installations are completed by homeowners who have taken time to install materials correctly. The most important skill needed is care and attention to the intricate details. You must also follow the appropriate health and safety measures at all times. We would be pleased to support you with further installation information if DIY is an option for you. 

Read our step-by-step installation guide or you can download the PDF version here.

How do I buy the materials needed?

All the materials needed can be purchased on this website. Links to each product can be found in the copy above or at the end of the blog post (with pictures).

To calculate quantities needed, you will need to know the total square meterage of the floor being insulated, the depth of the joists, the distance between joists, and the length of the perimeter of the room (e.g. 4x5m room: perimeter = 4+4+5+5 = 18m). 

These values can then be used with the quantity calculators that can be found on each product's webpage. 

Total square meterage is needed to calculate the quantity required of: 

  • Pro Clima Solitex Plus membrane
  • Pro Clima DA membrane
  • Thermo Hemp Combi Jute insulation
  • Airtight tape for sealing membrane overlaps

The depth of the joists is used to decide what thickness of insulation is needed (e.g. 100mm). 

The distance between joists is used to know what width of insulation is needed (usually 375mm wide insulation for floor joists with approx. 400mm centres). 

The perimeter of the room is used to calculate how much tape is needed to seal around the edges. 

If you have any problems selecting materials or quantities, contact our team with all your dimensions and sizes - we will be happy to help!

Technical Support

Ireland
+353 46 9432104
UK
+44 (0)1228 711511
Email
info@EcologicalBuildingSystems.com

Blog author

Dave Judd

Dave Judd

Technical Specification Advisor (BSc Hons, MSc)

Dave has extensive experience with energy efficiency retrofits and is well acquainted with the “fabric first” principles of integrating airtightness and insulation in both new-build and existing buildings. He has also worked within the domestic renewable energy sector, with the main emphasis on solar PV, solar thermal and biomass systems. He has a Degree in Environmental Science and an MSc in Architecture: Advanced Environment & Energy Studies and recently qualified as a Certified Passive House Tradesperson with the Passive House Institute. Outside of work, Dave enjoys trail running and cycling, growing vegetables and being sociable.

Related Products

Read More

Blog

Gutex Multitherm Roof Insulation - Passive House Insulation Series (part 3)

Read more
Blog

Roof Refurbishment Renovation WUFI study

Read more
Recently viewed products

This website uses cookies to ensure you get the best experience on our website. 

View our cookie policy here.