


Redstone Clima Redboard Pro Soffit Board
 Certification")
")
Product calculator
Product Overview
Main purpose
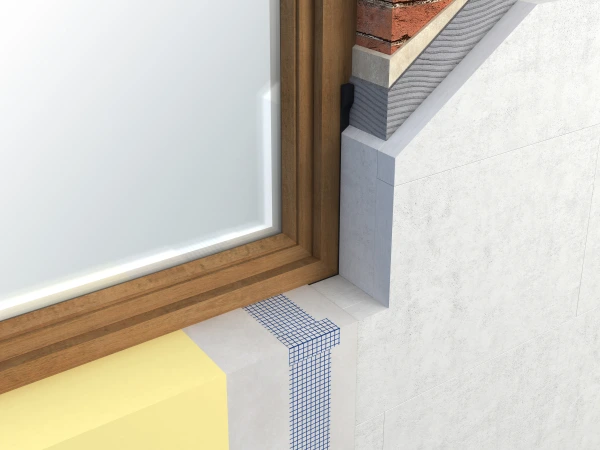
Insulation for window and door reveals. Manages moisture, regulates humidity, eliminates mould and minimises heat-loss; especially in older or historic buildings or newer buildings suffering condensation and mould problems.
Use it on
Interior window and door reveals in solid stone or masonry walls, or in confined spaces where thicker boards are impractical.
Overview
Redboard Clima Redboard Pro Soffit Board is a smaller and thinner version of Redstone’s Clima Redboard Pro. It is conveniently sized for use around windows and doors and is only 15mm thick to provide thermal insulation benefits without affecting the space within the window and door reveal opening too much.
Features
- Prevents mould growth and inhibits condensation
- Improves thermal comfort
- Easy installation around windows
Benefits
- Prevents condensation and mould at vulnerable window reveals due to the board’s capillarity, breathability and alkalinity.
- Insulating window reveals significantly increases the surface temperature, helping to eliminate thermal bridges to provide a robust internal wall insulation upgrade.
- The board’s weight, size and thickness ensure an easier installation around windows.
Questions
Can Climate Board be finished with a gypsum based plaster?
Technical Details
Key Technical Data
Installation Guide
How to Install
Apply Clima Redboard Pro Adhesive Mortar to the window or door reveal with notched trowel >/=10mm. Ensure the gaps between soffit boards and the Calsitherm on the external wall are as small as possible (no more than 2-3mm) and are butted to adjacent Calsitherm boards.
Apply the board pressing it tightly on to the surface. For optimum performance, the soffit board must be completely bonded to the window or door reveal with no air pockets behind.
Pro Clima Contega Fiden Exo compression tape is then used to seal the joints between the Clima Redboard Pro boards and the adjacent building elements such as windows, doors, walls, floors, ceilings or service penetrations.
Finish by applying a layer of Clima Redboard Pro Finishing Plaster (KP Kalkglaette), followed by Reinforcing Mesh to overlap the adjacent wall, then a second coat of Finishing Plaster.
In order to optimise the performance of the Clima Redboard Pro System, the finishing layer should be a breathable paint such as Auro natural paint.
Hints & Tips
Clima Redboard Pro Soffit Boards should be installed on to a level surface where all gypsum plaster has been removed. Any firmly attached cement or lime based plaster may remain in place. All non-breathable paint and wallpaper must be removed prior to application.
If the wall is uneven, use a lime based plaster or Diathonite (for additional insulation) to level it before installing Clima Redboard Pro. Any mould on the stone/brick should be cleaned off before applying the levelling coat.
Ceramic Tiling on top of Clima Redboard Pro
If you wish to use ceramic tiles on the wall, at least one-third of the area insulated with Clima Redboard Pro must be left un-tiled so the system can continue to work effectively. Wallpaper is not suitable for use over Clima Redboard Pro boards.
In bathrooms/wet rooms on walls outside shower area:
- Apply first layer of Luno Kalkglätte (Luno Smooth Finishing Plaster) with the Reinforcing Mesh
- Then apply 4 insulation fixings per m2 to ensure the boards are bonded and mechanically fastened to the wall. Redstone recommend the Fischer TermoZ CN 8 or similar approved.
- Then apply the second layer of Luno Kalkglätte (Luno Smooth Finishing Plaster)
- Following this the tile adhesive and tiles may be applied.
In bathrooms/wet rooms on walls inside an enclosed shower/bath area:
- Apply first layer of Luno Kalkglätte (Luno Smooth Finishing Plaster) with the Reinforcing Mesh
- Then apply 4 insulation fixings per m2 to ensure the boards are bonded and mechanically fastened to the wall. Redstone recommend the Fischer TermoZ CN 8 or similar approved.
- Apply a waterproofing system such as the following: Sopro AEB 640: AEB® waterproofing and separating membrane.
- For detailed application instructions for the waterproofing system specifiers must refer to the manufacturers technical datasheet e.g. Sopro AEB 640 (how to apply a suitable tile adhesive to their system)
- The tiles now can be applied directly on the AEB 640